The Sprout Studio importer is in Settings → Imports → Sprout Studio. It reads native CSV reports: two contact reports, then four financial reports if you want invoice and payment history.
These steps and screenshots were checked on 9 September 2026 in an account with fictional clients. Use dates covering your own business history. Financial reconstruction supports Australian dollars (AUD) only.
Open the Sprout Studio importerSet the complete date range
- 01
In Sprout Studio, open Reports in the left sidebar, then Analytics → Contact Analytics in the top navigation.
- 02
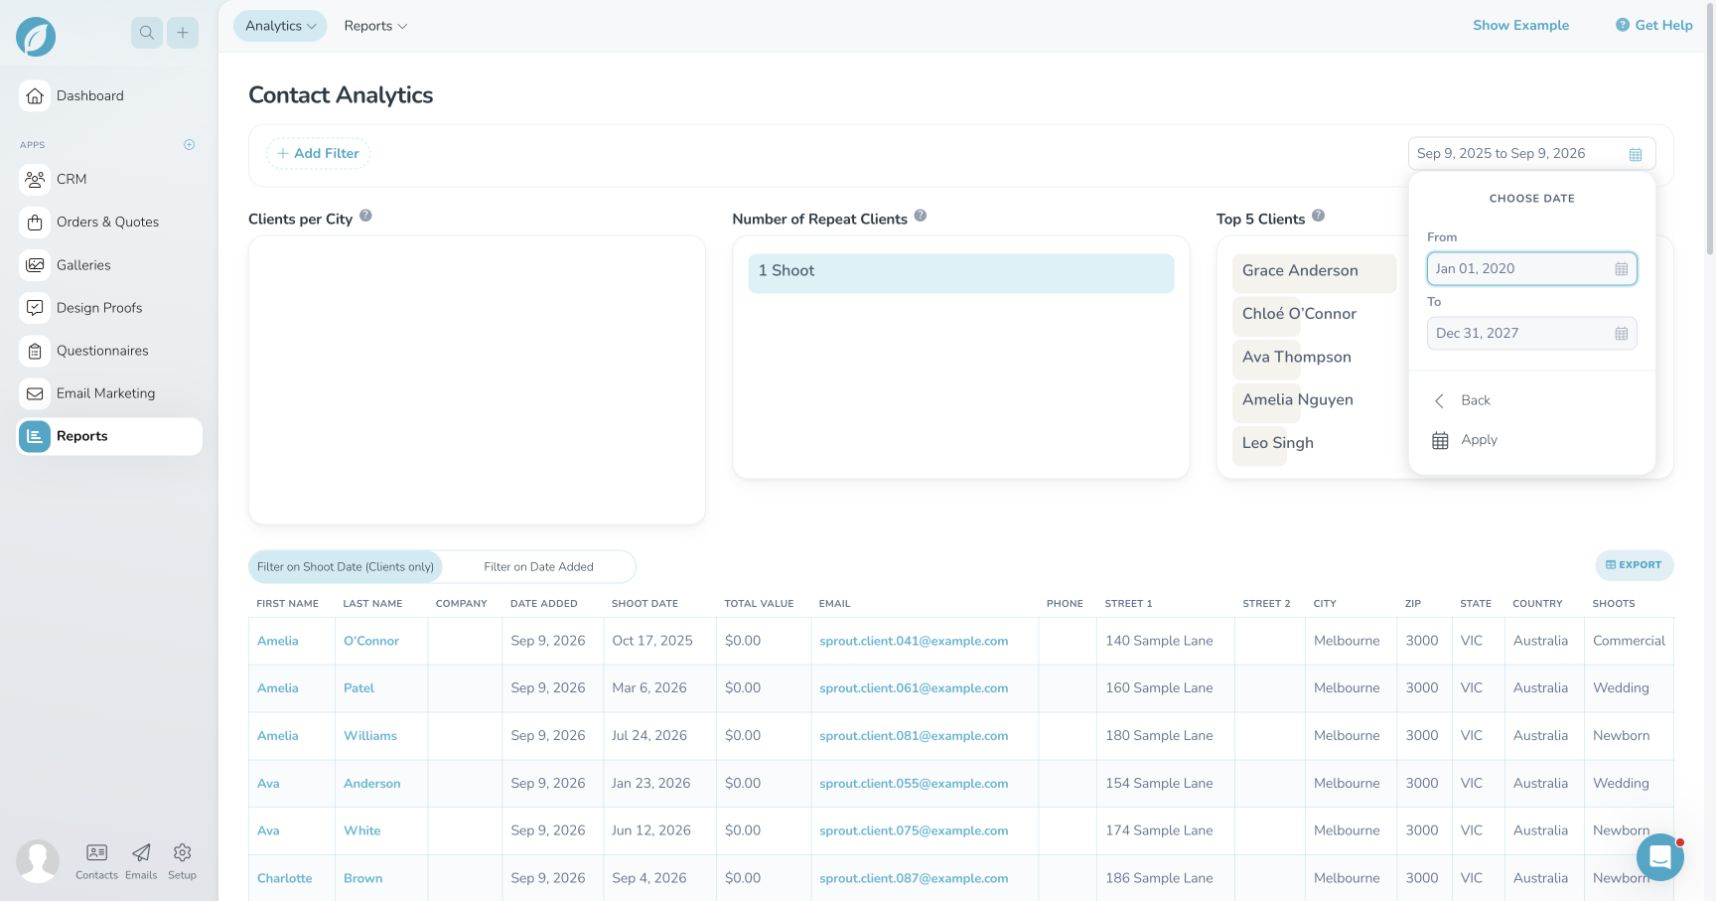
Click the date range at the top right. Scroll the date menu and choose Custom Range.
- 03
Choose From and use the calendar's year, month and day controls. Set a date before your earliest record. Choose To and include future bookings, then click Apply.
- 04
Leave brand and user restrictions unset when exporting the whole business. Check other report filters before downloading.
Export both contact reports
- 01
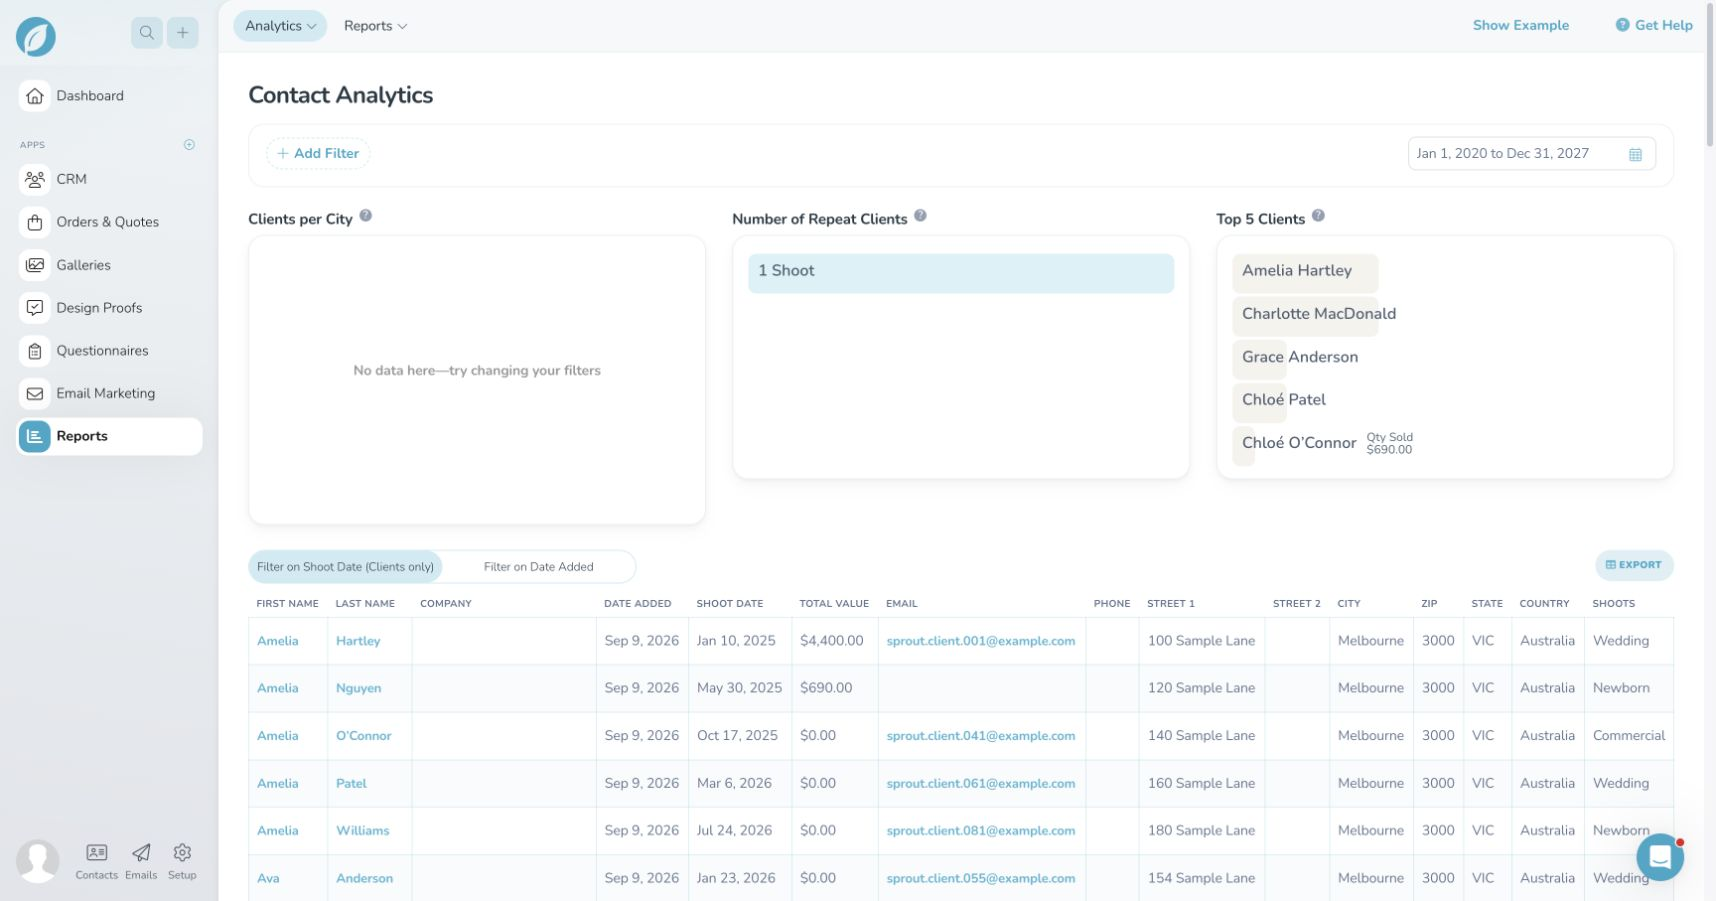
Above the contact table, select Filter on Shoot Date (Clients only). Check the date range, click EXPORT and save the CSV as
contacts-shoot-date.csv. - 02
Select Filter on Date Added, then click EXPORT again. Save this second CSV as
contacts-date-added.csv. - 03
Keep both files. The shoot-date report adds dates and session types; the date-added report covers contacts by when they were added.
These filenames are suggestions for keeping the downloads clear. Arbour recognises the report columns, so original download names also work.
Export payments and past-due invoices
Check dates again on every report
Sprout Studio can reset the date range when you change reports. Reapply the complete range and check the currency before every export. Select AUD for every financial report.
- 01
Open Reports → Income Report from the top navigation. Set the complete date range again and select AUD as the currency.
- 02
Select Payments Received above the table. Click EXPORT and save
payments-received-aud.csv. - 03
With the same dates and currency, select Past Due Invoices and click EXPORT. Save
past-due-invoices-aud.csv.
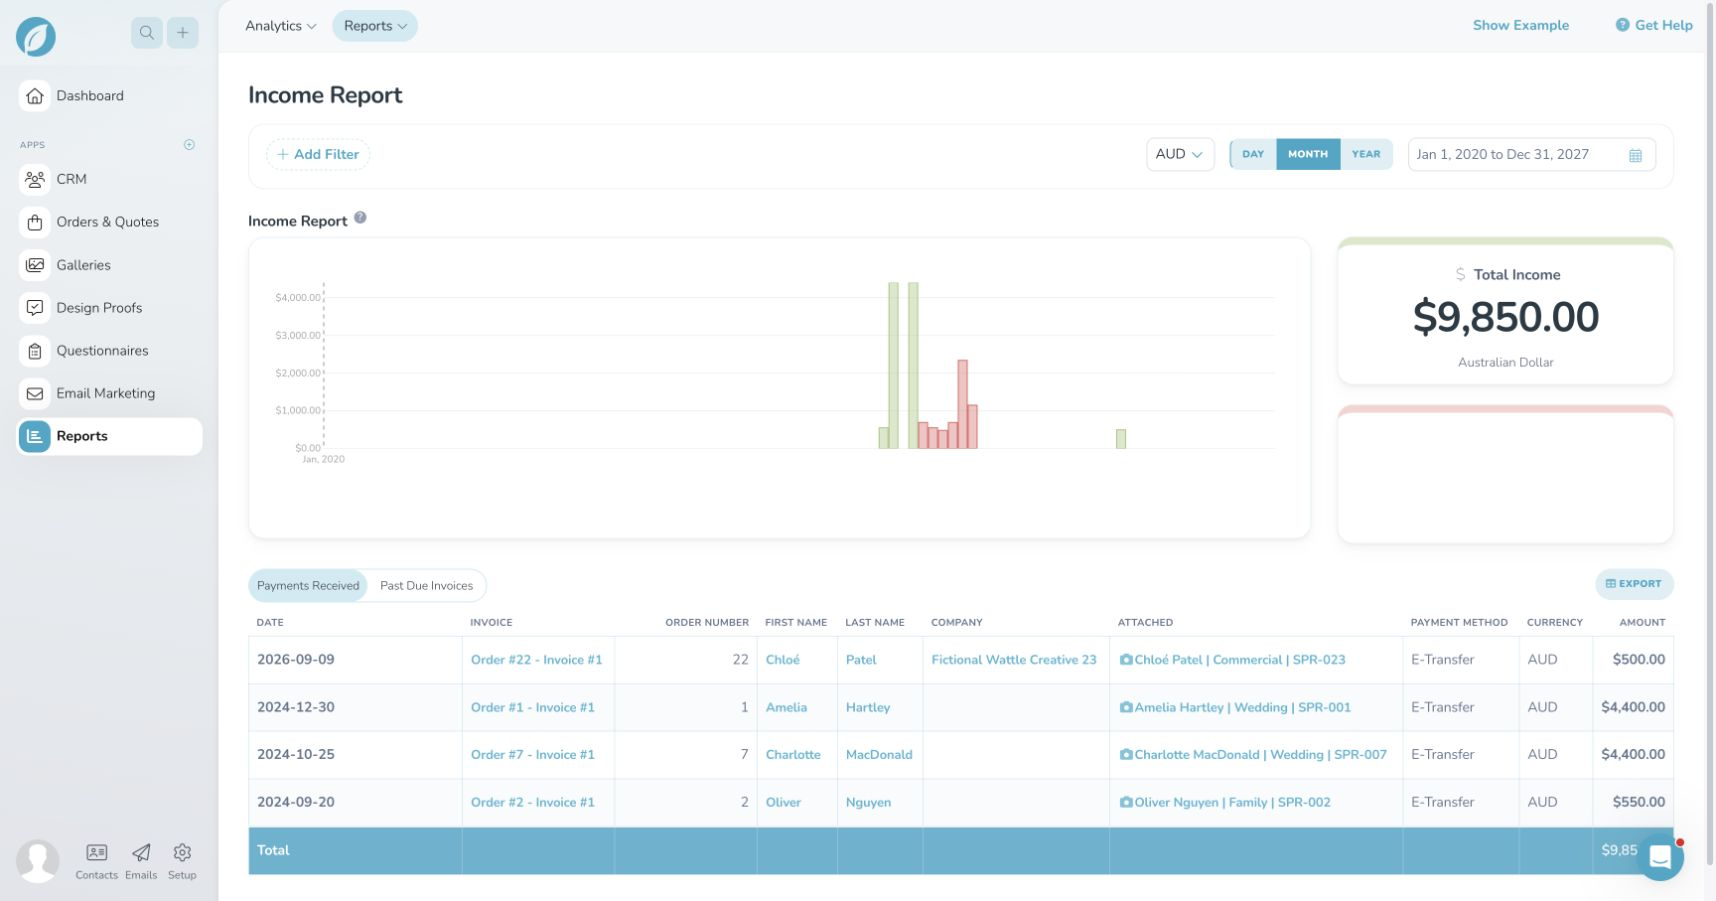
Past Due Invoices is not every unpaid invoice: an invoice whose due date is still in the future may be absent. Keep that distinction when comparing report totals.
Export the sales log and general ledger
- 01
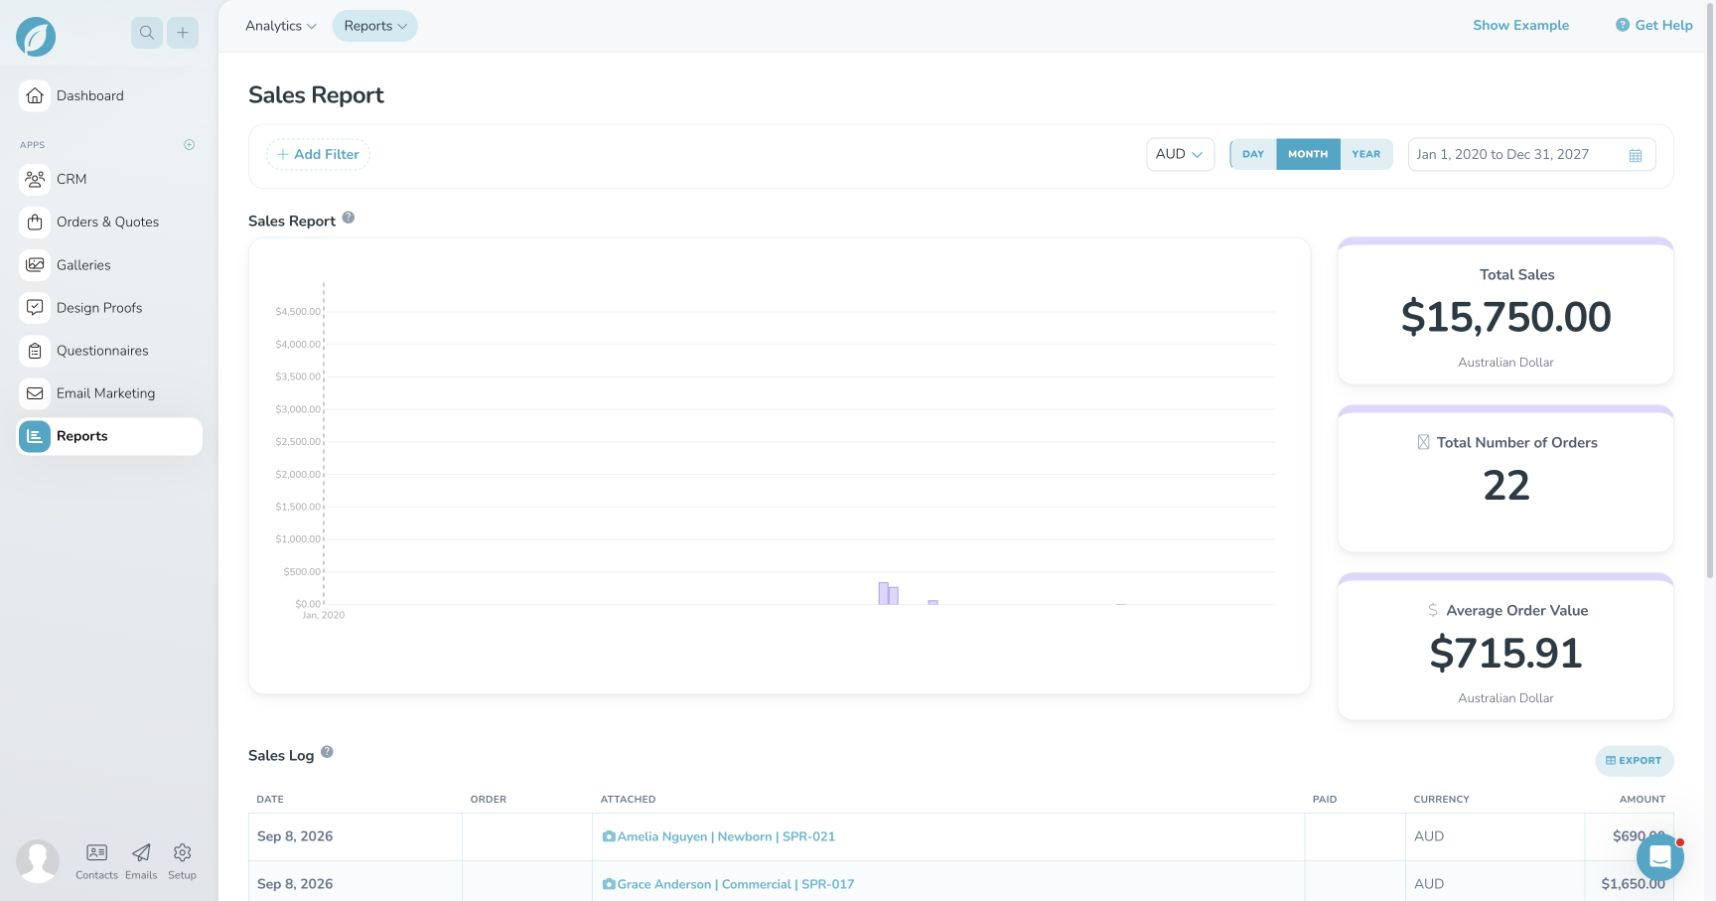
Open Reports → Sales Report. Reapply the complete date range and select the same currency.
- 02
Scroll below the chart to Sales Log. Click its EXPORT button and save
sales-aud.csv. - 03
Open Reports → General Ledger, reapply the same dates and currency, then click EXPORT above the ledger table. Save
general-ledger-aud.csv.
Check the files and create the ZIP
| File | What to check |
|---|---|
contacts-date-added.csv | Contact details and coverage by date added |
contacts-shoot-date.csv | Shoot dates and session types within the selected range |
payments-received-aud.csv | Payment dates, invoice references, currency and amounts |
past-due-invoices-aud.csv | Overdue balances, remembering future unpaid invoices may be absent |
sales-aud.csv | Invoiced sales listed in the Sales Log |
general-ledger-aud.csv | Recorded income matching the payments report |
Place all six files together in one folder and compress it to a ZIP. Keep one copy of each report and leave its contents unchanged. Avoid adding earlier exports or backup copies. Both contact reports are required; if you include financial history, include all four financial reports together. A contact-only import can contain just the two contact reports.
An empty report often means its dates, currency or filters need checking. Wait for every download to finish before compressing the folder. Only AUD financial reports are supported. If your financial history uses another currency, prepare a working ZIP containing just the two contact reports and keep the financial exports for separate review. Re-importing does not add invoices to a shoot already imported, so decide which history to include before starting.
Review and import
Upload the ZIP, choose the booking stage and review the invoice reconstruction option. Compare the preview counts and warnings with the exported data rows, excluding the CSV headings. Start the import only after any missing or ambiguous report information is resolved.
Contacts with shoot details become bookings using the exported dates and session type. Contacts without shoot details remain contacts. Company, postal address and the source date added are retained in a note on the contact. Financial reports can create summary invoices and recorded historical payments when their references and totals agree. Summary invoices preserve report amounts; the exports do not provide original line items or enough information to recreate their GST treatment.
Column order can vary and optional contact details can be absent. Extra contact fields are retained in contact notes; extra shoot fields and differing details between the two contact reports are retained in booking notes. The preview lists the additional field labels and their destination. These values remain text, including custom dates and choice labels.
Unknown populated financial columns require review before reconstruction because they may change the meaning of the reported amounts. Keep the original exports. To import contacts and shoots without financial history, use a working ZIP containing just the two contact reports.
What needs separate attention
- Contact Analytics is not a complete shoot archive. It omits stable shoot IDs, original job titles, statuses, private notes and documents. The
shootscolumn describes the session type. - Imported shoots use the booking stage you select and an active outcome because the reports do not give their original statuses. Review completed and cancelled work after importing.
- Arbour preserves dates from the CSV. Some native report dates can differ by one day from the shoot editor, so check important bookings against the original calendar.
- An order labelled Paid, or a checkmark in a sales CSV, does not establish a payment. The payments and ledger reports supply the recorded payment history.
- The Sales Report's headline order count can exceed the exported Sales Log count. Orders without an invoice schedule may be missing from the CSV.
- Re-importing depends on identities built from the exported contact and shoot information. These exports omit stable shoot IDs, so changing that information can change the import identity. Review renamed or changed records before uploading a later export.
See Importing data for progress, retries and checking your imported records.